Introduction
With TDM Digital Signage, you have the ability to send RS232 commands. This functionality allows you to power on or off displays connected to your Windows machine.
This manual explains how the RS232 software can be installed and configured.
Requirements
To install the RS232 service, you need to meet the following requirements:
-
Have administrator access to the TDM Designer
-
Have access to the Windows player that will be used to send RS232 commands
How To Install the RS232 Service
In this section, we explain how to install the RS232 service on your Windows machine. This requires an installation file, which you can download by logging into your TDM Designer.
-
Log in to the Designer with an administrator account on your Windows-based machine: https://designer.tdmsignage.com
-
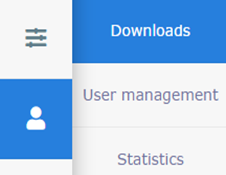
Once logged in, select Administration > Downloads.
-
From here, download the setup file called ‘TDM RS232 Service’.
-
Launch the downloaded setup file on your Windows-based machine to install the RS232 service.
-
Read the instructions and click Next.
-1.png?width=435&height=356&name=mceclip1%20(1)-1.png)
-
Select your preferred installation folder and click Next.

-
Click Next again to start the installation.

-
Select Close once the installation is finished.
-
Now that the installation has finished, we can start configuring the service.
The first step is to copy the file called ‘Utils.dll’ fromC:\TDMSignageto the installation folder of the RS232 service:C:\Program Files (x86)\Blue and Red\TDM RS232 Service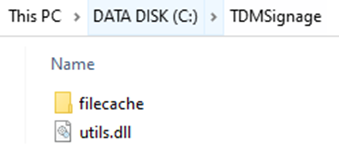
-
Next, we need to configure the COM port, baud rate, and data bits. These settings can be configured in the file called ‘RS232Service.exe.config’, located in the installation directory of the RS232 service. You can modify this file with a text editor such as Notepad.

-
Once the values have been configured, restart the RS232 service as follows: click Start and search for Services.

-
Locate the service called ‘TDM RS232 Service’. Right-click the service and select Restart.
-
If everything is configured correctly, the RS232 log file will confirm that the schedules have been found. The log file can be found here:
C:\Program Files (x86)\Blue and Red\TDM RS232 Service
It is the.txtfile in the folder. When you open it, it should mention something similar to:03:17:11.547 PM INFO Getting new schedules from webservice03:17:11.903 PM INFO 6 schedules found
You have now finished configuring the RS232 service. The service will send commands at the configured time to the COM port specified in the configuration file.
How To Configure RS232 Schedules Inside the Designer
-
Log in to the Designer with an administrator account: https://designer.tdmsignage.com
-
Go to Config Panel.

-
Select the tab RS232 Schedules. From this tab, you can create new schedules.

-
When creating a new schedule, ensure it is set for at least 15 minutes in the future.
-
Use the commands below according to your display brand. If the commands do not work, please contact your manufacturer or hardware supplier, as your device type may require different commands.
Sony
| Command | HEX Representation |
|---|---|
| Enable Standby | x8C x00 x01 x02 x01 x90 |
| Power On | x8C x00 x00 x02 x01 x8F |
| Power Off | x8C x00 x00 x02 x00 x8E |
| Volume Up | x8C x00 x05 x03 x00 x00 x94 |
| Volume Down | x8C x00 x05 x03 x00 x01 x95 |
| Mute Toggle | x8C x00 x06 x02 x00 x94 |
| Info (Display) | x8C x00 x0F x02 x00 x9D |
| Input HDMI 1 | x8C x00 x02 x03 x04 x01 x96 |
| Input HDMI 2 | x8C x00 x02 x03 x04 x02 x97 |
| Input HDMI 3 | x8C x00 x02 x03 x04 x03 x98 |
| Input HDMI 4 | x8C x00 x02 x03 x04 x04 x99 |
| Action Menu | x8C x00 x67 x03 x97 x36 xC3 |
| Up | x8C x00 x67 x03 x01 x74 x6B |
| Down | x8C x00 x67 x03 x01 x75 x6C |
| Right | x8C x00 x67 x03 x01 x33 x2A |
| Left | x8C x00 x67 x03 x01 x34 x2B |
| Enter (OK) | x8C x00 x67 x03 x01 x65 x5C |
| Return (Back) | x8C x00 x67 x03 x97 x23 xB0 |
| Home | x8C x00 x67 x03 x01 x60 x57 |
LG
| Command | HEX Representation |
|---|---|
| Power On | x6B x61 x20 x30 x31 x20 x30 x31 x0D |
| Power Off | x6B x61 x20 x30 x31 x20 x30 x30 x0D |
| Volume Up | x6D x63 x20 x30 x31 x20 x30 x32 x0D |
| Volume Down | x6D x63 x20 x30 x31 x20 x30 x33 x0D |
| Mute | x6B x65 x20 x30 x31 x20 x30 x30 x0D |
| Unmute | x6B x65 x20 x30 x31 x20 x30 x31 x0D |
| Info (Display) | x6D x63 x20 x30 x31 x20 x61 x61 x0D |
| Menu | x6D x63 x20 x30 x31 x20 x34 x33 x0D |
| Up | x6D x63 x20 x30 x31 x20 x34 x30 x0D |
| Down | x6D x63 x20 x30 x31 x20 x34 x31 x0D |
| Right | x6D x63 x20 x30 x31 x20 x30 x36 x0D |
| Left | x6D x63 x20 x30 x31 x20 x30 x37 x0D |
| Enter (OK) | x6D x63 x20 x30 x31 x20 x34 x34 x0D |
| Return (Back) | x6D x63 x20 x30 x31 x20 x32 x38 x0D |
| Exit | x6D x63 x20 x30 x31 x20 x35 x62 x0D |
| Picture Size: Just Scan | x6B x63 x20 x30 x31 x20 x30 x39 x0D |
Samsung
| Command | HEX Representation |
|---|---|
| Power On | x08 x22 x00 x00 x00 x02 xD4 |
| Power Off | x08 x22 x00 x00 x00 x01 xD5 |
| Volume Up | x08 x22 x01 x00 x01 x00 xD4 |
| Volume Down | x08 x22 x01 x00 x02 x00 xD3 |
| Mute Toggle | x08 x22 x02 x00 x00 x00 xD4 |
| Select HDMI 1 | x08 x22 x0a x00 x05 x00 xc7 |
| Select HDMI 2 | x08 x22 x0a x00 x05 x01 xc6 |
| Select HDMI 3 | x08 x22 x0a x00 x05 x02 xc5 |
| Select HDMI 4 | x08 x22 x0a x00 x05 x03 xc4 |
| Info (Display) | x08 x22 x0D x00 x00 x1F xAA |
| Menu | x08 x22 x0D x00 x00 x1A xAF |
| Up | x08 x22 x0D x00 x00 x60 x69 |
| Down | x08 x22 x0D x00 x00 x61 x68 |
| Right | x08 x22 x0D x00 x00 x62 x67 |
| Left | x08 x22 x0D x00 x00 x65 x64 |
| Enter (OK) | x08 x22 x0D x00 x00 x68 x61 |
| Return (Back) | x08 x22 x0D x00 x00 x58 x71 |
| Exit | x08 x22 x0D x00 x00 x2D x9C |
| Picture Size: Screen Fit | x08 x22 x0B x0A x01 x05 xBB |