Introduction
TDM allows you to add external data sources that display real-time information within your presentations.
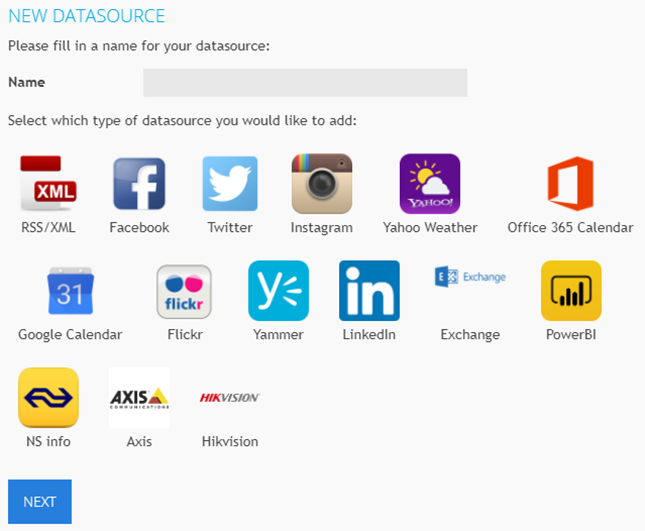
TDM supports the following external data sources:
-
Facebook
-
Twitter
-
Instagram
-
OpenWeather
-
Office 365 Calendar
-
Google Calendar
-
Flickr
-
Yammer
-
LinkedIn
-
Exchange
-
Power BI
-
NS
-
Axis (People Counter camera)
-
HikVision (People Counter camera)
This guide explains how to set up a Google Calendar data source in TDM.
Requirements
To set up a Google Calendar data source, you need:
-
Administrator access to the TDM Designer
-
Administrator access to the Google Cloud Platform (GCP)
How to Set Up a Google Calendar Data Source
Step 1: Create OAuth 2.0 Credentials
-
Go to the Google Cloud Platform API Console:
https://console.developers.google.com/flows/enableapi?apiid=calendar -
Click “Create Project”, enter a project name, and select “Create.”
-
Enable API access by clicking “Next”, then “Enable” on the following screen.
-
Before creating client credentials, configure the OAuth consent screen:
-
From the navigation menu, select APIs & Services → OAuth consent screen.
-
Choose “External” as the user type (or “Internal” if you are a Google Workspace user).
-
Click “Create.”
-
-
In the App Information section:
-
Enter an App name (e.g., TDM Digital Signage).
-
Provide a user support email address.
-
-
In the App Domain section, add the following domain as an authorized domain:
tdmsignage.comUse the “+ Add Domain” button.
Then, provide a developer contact email address and click “Save and Continue.” -
On the next two screens (Scopes and Test users), click “Save and Continue.”
-
Review the summary on the OAuth consent screen page and select “Back to Dashboard.”
-
The app will now be in Testing mode. To publish it, click “Publish App” and confirm to push it to Production.
-
Next, create the Client ID and Secret:
-
From the side menu, select Credentials → + Create Credentials → OAuth client ID.
-
Choose “Web application” as the application type.
-
(Optional) Edit the default client name.
-
-
Under Authorized redirect URIs, click “+ Add URI” and enter:
https://designer.tdmsignage.com/4.4/authenticateThen click “Create.”
Note: The version number (4.4) will change with future TDM updates (e.g., 4.5, 4.6, 5.0).
You must add the updated URI each time your TDM platform is upgraded. -
A pop-up will display your Client ID and Client Secret.
Save this information — it will be needed in the next step.
(If you close the pop-up, you can retrieve these values later by selecting the created client from your credentials list.)
Step 2: Create the Google Calendar Data Source in TDM
-
Log in to the TDM Designer using an administrator account:
https://designer.tdmsignage.com -
Open the Config Panel from the left-hand menu.

-
Select the “External Data” tab.
-
Click the “+” button on the right side to create a new data source.

-
In the pop-up window, enter a name for your data source. Select “Google Calendar.” Click “Next.”
-
Enter your Client ID and Client Secret, then click “Save.”
-3.png?width=433&height=258&name=mceclip4%20(1)-3.png)
-
Once created, click the eye icon next to your Google Calendar data source to preview the information.
-1.png?width=423&height=56&name=mceclip5%20(1)-1.png)
You have now successfully created a Google Calendar data source in TDM.
Your signage can now display up-to-date events and scheduling information directly from Google Calendar.